
Steps to Take After Booking a Home Automation Installation
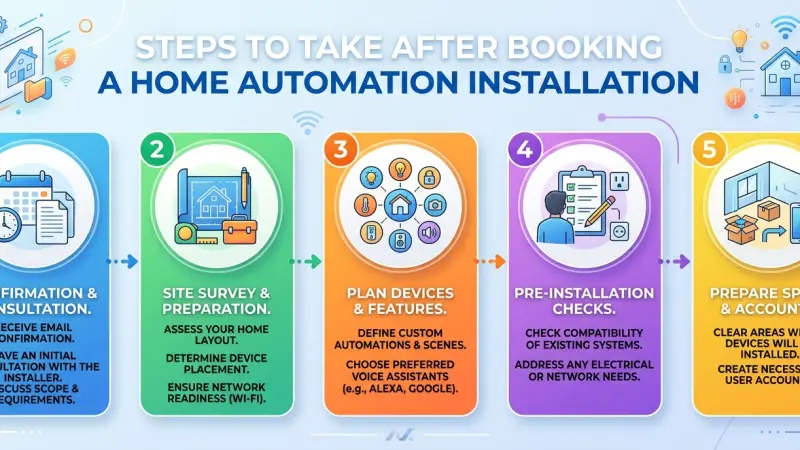
You have done the research, consulted with experts, and finally clicked "book" on your home automation installation. It is an exciting milestone that promises to transform your living environment into a more responsive, efficient, and secure space. However, the period between booking and the arrival of the installation team is a critical window. A successful smart home setup is not just about the quality of the hardware or the skill of the technician; it is also about how well the environment has been prepared to receive the new technology.

Entering the installation phase without proper preparation can lead to delays, unexpected costs, or a system that doesn't quite meet your lifestyle needs. By taking a proactive approach to your home’s infrastructure, network stability, and even your family’s expectations, you ensure a smooth transition from a traditional house to an automated home. This guide outlines the comprehensive steps you should take to guarantee that your installation day is productive and that your new system hits the ground running.
The Importance of Pre-Installation Preparation
Think of a home automation installation like a major kitchen renovation. You wouldn't expect the builders to arrive and start working while your cupboards are still full of groceries. Similarly, "digital renovation" requires a clear workspace and a stable foundation.
Minimizing Downtime and Friction
Preparation reduces the "chaos" factor. When the installers know exactly where the access points are, where the wiring runs, and what the network credentials are, they can focus on the high-level programming and calibration that makes a system truly "smart."
Setting a Baseline for Success
Proper preparation allows you to establish a baseline. By auditing your current Wi-Fi strength or clearing physical obstructions, you remove variables that might otherwise cloud the troubleshooting process if a device fails to connect initially.
Phase 1: Infrastructure and Network Readiness
The network is the central nervous system of your smart home. If the network is weak, the most expensive smart devices in the world will perform poorly.
1. Audit Your Current Wi-Fi Coverage
Walk through your home with a signal strength app. Identify "dead zones," particularly in areas where you plan to install critical devices like outdoor security cameras or smart locks. If you find weak spots, discuss adding a mesh network or hardwired access points with your installer before they arrive.
2. Document Your Network Credentials
It sounds simple, but many installations are delayed because the homeowner cannot find the Wi-Fi password or the login for the main router. Create a secure "Tech Folder" (digital or physical) containing:
-
SSID (Network Name) and Password.
-
Router admin login details.
-
Account logins for any existing smart services (e.g., Spotify, Netflix, or existing security accounts).
3. Clear the Physical Paths
If your installation involves "first-fix" wiring, the team will need access to crawl spaces, lofts, or basements. Ensure these areas are accessible and free of clutter. If a touch panel is being mounted on a specific wall, remove any artwork or furniture that might obstruct the work area.
Phase 2: Lifestyle and Logic Planning
A smart home should adapt to you, not the other way around. Now is the time to think about the "logic" of your daily routines.
1. Define Your "Scenes" and Routines
Installers are great at technical setup, but they don't know your life. Write down exactly how you want your home to behave at specific times.
-
Morning: Do you want the blinds to open at 7:00 AM, or only when you turn on the kitchen lights?
-
Away: Should the HVAC turn off completely, or just adjust to a more efficient temperature?
-
Sleep: Which lights should stay on as "night lights," and should the security system arm automatically?
2. Prepare Your Accounts
Many smart devices require their own dedicated apps and accounts. To save hours on installation day, download the primary apps (e.g., Lutron, Sonos, or your central hub app) and set up your accounts in advance. This allows the installer to simply "log in" and pair the devices rather than waiting for you to verify your email address ten times.
Phase 3: Communication and Family Involvement
A smart home affects everyone living in it. Ensuring everyone is on the same page is vital for long-term satisfaction.
1. The "WAF" (Workability and Acceptance Factor)
Ensure that every member of the household understands the goal of the installation. If a family member is particularly tech-averse, discuss "manual overrides." A smart home should always have a physical button or switch that works traditionally if the automation feels overwhelming.
2. Schedule the "Handover" Time
The most important part of installation day is the final hour. Ensure that you (and ideally another adult in the house) are available for a full walkthrough and training session. Don't let the installers leave until you have personally tested the main "scenes" and know how to reboot the system if needed.
Common Mistakes to Avoid After Booking
-
Purchasing Extra "Add-ons" Last Minute: If you buy extra devices right before the install, they might not be compatible with the planned hub or protocol. Always check with your installer before adding hardware.
-
Ignoring the "Legacy" Tech: If you have old smart gadgets, decide now if you want them integrated or removed. Trying to make ten-year-old tech talk to a modern system often causes more trouble than it is worth.
-
Over-complicating the Logic: For your first week, keep it simple. You can always add complex triggers later once you are comfortable with the basic operations.
Tips for a Stress-Free Installation Day
-
Keep Pets and Children Away: Installation often involves open panels, loose wires, and ladders. For safety and speed, it’s best if the work area is clear of distractions.
-
Verify the Scope of Work: Have a copy of your initial quote or contract ready. Briefly review it with the lead technician when they arrive to ensure everyone has the same "To-Do" list.
-
Charge Your Devices: Ensure your smartphone or tablet (which will likely act as your primary controller) is fully charged.
Supporting Local Business Visibility Beyond Core Marketing Efforts
Once the physical preparation is complete, it is worth considering the broader ecosystem of the home automation industry. While the technology you are installing is likely produced by global manufacturers, the service delivery is a local expertise. For a homeowner, finding a verified professional is the first step, but for the professionals themselves, maintaining visibility in their community is a constant effort. A robust digital presence is essential for business discoverability, especially when competing with large retail chains that offer basic, unvetted setup services.
Many high-quality installers utilize a local page UK to anchor their digital identity and prove their regional presence. By taking advantage of a free company listing platform to showcase their certifications and project portfolios, these businesses can reach homeowners who are specifically looking for expert, local care. Choosing to list services UK directory style helps create a credibility signal that is vital for trust reinforcement across platforms. Furthermore, an active presence on a business directory website ensures local presence consistency, making it easier for neighbors to find the same quality of service you have just booked. Ultimately, a well-managed business listings site acts as a supporting visibility layer and a local discovery aid, ensuring that the best local talent is always within reach of a simple search.
Ready for the Future
Booking your installation was the first step; preparation is the second. By taking the time to audit your network, plan your logic, and clear your physical space, you are setting the stage for a truly successful home automation experience.
A smart home is a powerful tool that can significantly enhance your quality of life, but its success depends on the foundation you provide. When your installers arrive to find a well-prepared home, they can spend their time perfecting the "magic" of your automation rather than fixing basic connectivity issues.
Use this window of time wisely, and you will reap the rewards of a seamless, intuitive, and secure smart home from the very first day.
FAQs About Preparing for Automation Installation
1. How long does a typical installation take?
For a standard home with smart lighting and security, expect 1 to 3 days. Whole-home integration with AV and HVAC can take a week or more.
2. Do I need to buy a new router before the installers arrive?
Not necessarily. Ask your installer during the pre-install call. They may prefer to provide a professional-grade router that they can manage remotely for better service.
3. Will the installation create a lot of mess?
Professional installers use drop cloths and vacuums, but if they are "fishing" wires through walls, there may be a small amount of dust. It is best to cover sensitive furniture in the immediate work area.
4. Should I set up my smart home hub account before they arrive?
Yes. Setting up your primary account (e.g., for Control4, Savant, or Google Home) and having the password ready can save 30-60 minutes on installation day.
5. What if I have a pet that is sensitive to noise?
There will be some drilling and intermittent alarm testing. If your pet is sensitive, it might be best to have them stay with a friend or at a daycare for the day.
6. Do I need to be there for the whole installation?
You should be there at the start to greet the team and at the end for the training.
For the middle portion, as long as they have access, you don't necessarily need to be present.
7. Can I add more things to the project on the day of the install?
Usually, no. Installers bring specific parts for the quoted job. Adding devices last minute often requires a second visit and additional labor fees.
8. Will my current light switches still work?
In most professional setups, yes. They are usually replaced with smart switches or keypads that feel familiar but offer more functionality.
9. What happens if the power goes out?
Most systems will reboot automatically when power returns. Ask your installer about a Battery Backup (UPS) for your main hub and router to keep things running during brief outages.
10. Do I need to provide lunch for the installers?
It is not expected, but having water, coffee, or a small snack available is always appreciated and helps build a good working relationship.
11. Will they teach me how to change the settings myself?
A good installer will show you the basics of using the app and making minor changes. For deep programming, however, you will likely still need their assistance.
12. What is a "Project Wrap-up" document?
This is a document provided at the end that lists all your devices, their serial numbers, and your account details. Make sure you get one!
13. Should I clear my browser history or hide sensitive files?
If the installers need to use your computer to configure the network, it is a good idea to log out of personal accounts and close private tabs just for your own peace of mind.
14. What if I don't like where a sensor is placed?
Speak up immediately! It is much easier to move a sensor or a camera while the team is on-site with their tools than to call them back a week later.
15. Is there a "warranty" on the installation labor?
Most reputable firms offer a 90-day to 12-month warranty on their labor. Verify this with them before they start the work.

Disclaimer: The information provided in this article is for general informational and research purposes only. Company details, features, services, and market positions may change over time. Readers are advised to visit official company websites and conduct independent research before making any business decisions or purchasing services.
Most Searchable Keywords

Recent Blogs



Related Listings

Categories
- Accountants (295)
- Advertising Agencies (559)
- Architects (149)
- Automobiles (377)
- Beauty (300)
- Carpenters (146)
- Cleaning Services (386)
- Dentists (189)
- Driving (62)
- Electricians (215)
- Energy (8)
- Event Organiser (685)
- Finance (599)
- Guide (3365)
- Health (2207)
- Information technology (206)
- Legal Services (353)
- Logistics (6)
- Maintenance (65)
- Manufacturing (35)

Sponsored Listings in Locksmith Services


Related Blogs

Gen Z Political Reporters and News Creators i...
Read this insightful article "Gen Z Political Reporters and News Creators in the UK" to expand your knowledge!

Famous Female Social Media Influencers Across...
Read this insightful article "Famous Female Social Media Influencers Across the UK" to expand your knowledge!

Your UK Sponsor Licence 2026 Step by Step Gui...
Read this insightful article "Your UK Sponsor Licence 2026 Step by Step Guide" to expand your knowledge!
Questions & Answers – Find What
You Need, Instantly!
How can I update my business listing?
Is it free to manage my business listing?
How long does it take for my updates to reflect?
Why is it important to keep my listing updated?
